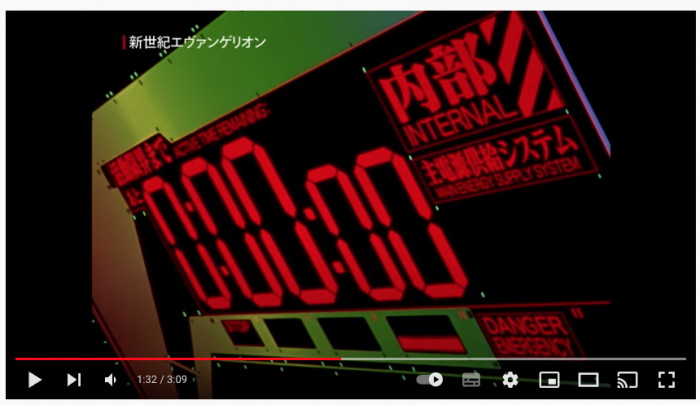
こういうのを作りたい!
考察とアイディア
- フォントがデジタル表示(7セグ)
- カウントダウンをどう作る?
- 分(1桁)・秒(2桁)・ミリ秒(2桁)
- コロン(:)で区切られている
- ミリ秒と区切りのコロンは小さい→分秒とミリ秒を分けて描画
- タイマー以外の部分が大変そう→画像ソフトで作成
ステップ1:フォントの実験
フォントの読み込み周りの作成と、7セグメントフォントの高さ指定が正確にできるのか?のテスト。
フォントがデジタル表示(7セグ)
→7セグメントフォント(DSEG7ClassicMini-Bold)
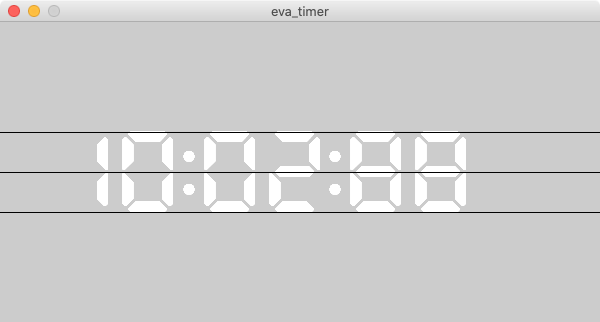
若干はみ出すが、ほぼ指定した高さで描画されている。
posTimer = PVector()
textTimer = "10:02:88"
fontSize = 80
def setup():
    size(600, 300)

    font = createFont(u"DSEG7ClassicMini-Bold", fontSize, False)
    textFont(font)

    # textWidthで文字列の幅が取得できるかのテスト
    print(textWidth(textTimer))

def draw():
    global textTimer

    # フォントの高さのテスト。上下中央に表示されるか?
    posTimer.x = 50
    posTimer.y = height / 2 + fontSize / 2
    text(textTimer,posTimer.x, posTimer.y)
    line(0, height / 2, width, height / 2)
    line(0, posTimer.y - fontSize, width, posTimer.y - fontSize)
    line(0, posTimer.y, width, posTimer.y)
ステップ2:カウントダウンの作成
カウントダウンをどう作る?
→以前作ったframeCount()では処理落ちした場合に遅延する
→別の方法
→millis()を使う。
→frameCount()がプログラム開始時からのフレーム数を返すのに対して、ミリ秒を返してくれる。
→これはメイン処理が重くなっても影響がない!はず!
表示の注意点
- 分(1桁)・秒(2桁)・ミリ秒(2桁)
- コロン(:)で区切られている
- ミリ秒と区切りのコロンは小さい
- 分秒とミリ秒を分けて描画
→ミリ秒の描画開始位置は分秒の幅による
→分秒の幅を調べるor計算する必要がある
→公式ドキュメントを調べたらtextWidth()で調べられる!使えそうだ!!
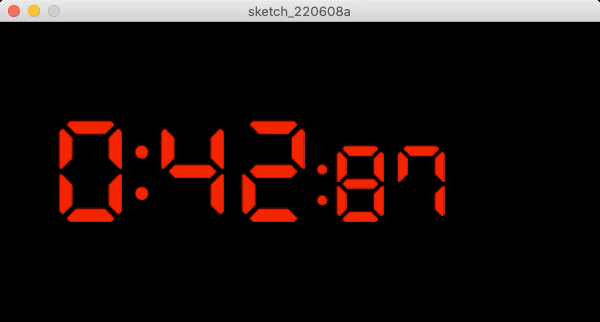
良い感じに出来た!
posTimer = PVector()
fontSize = 100
textM = ""
textS = ""
textMS = ""
timeStart = 50000 #(ミリ秒)
timeNow = 0

def setup():
    size(600, 300)

    # フォントの設定
    font = createFont(u"DSEG7ClassicMini-Bold", fontSize, False)
    textFont(font)
    fill(255, 0, 0)

def draw():
    global textTimer, timeNow, textM, textS, textMS

    # 背景
    background(0)

    # カウントダウン値(ミリ秒)を求める
    timeNow = timeStart - millis()

    # 分、秒、ミリ秒に分解&文字列化
    t = timeNow
    textM = "{}".format(t / (1000 * 60))
    t = t % (1000 * 60)
    textS = "{:02}".format(t / 1000) # 00ゼロ埋め
    textMS = "{}".format(t % 1000)[:2] # 左から2桁を切り出し

    # コロン(:)を結合
    text1 = textM + ":" + textS
    text2 = ":" + textMS

    # 分秒の描画(大きい部分)
    posTimer.x = 50
    posTimer.y = height / 2 + fontSize / 2
    textSize(fontSize)
    text(text1, posTimer.x, posTimer.y)

    # ミリ秒の描画(小さい部分)
    marginX = textWidth(text1)
    textSize(fontSize/4*3)
    text(text2, posTimer.x + marginX, posTimer.y)
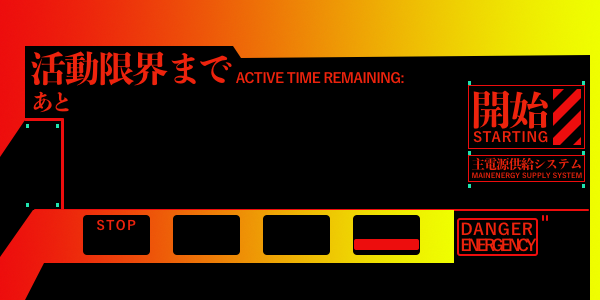
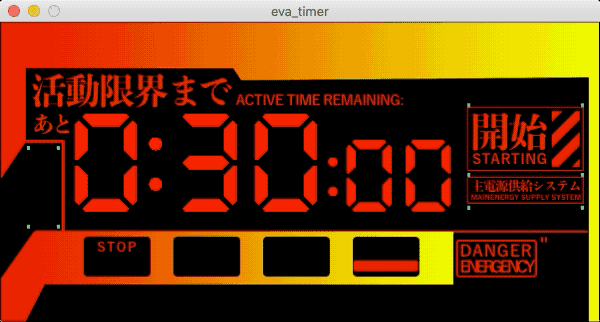
タイマー以外の部分が大変そう
画像ソフトで作成

参考画像をもとに真似して作ってみた。開始アラートの斜線部分を作るのが大変だった!簡素に作るはずだったけど…作り始めるとついついアレモコレモ🤪
完成画像
最終形態
そして色々あってこうなった
posTimer = PVector()
fontSize = 98
textM = ""
textS = ""
textMS = ""
timeStart = 60000 #(ミリ秒)
timeNow = 0
bg = None
isCameraActive = False

def setup():
    size(600, 300, P3D)
    global bg, timeNow

    # 背景
    bg = loadImage("background.png")

    # フォントの設定
    font = createFont(u"DSEG7ClassicMini-Bold", fontSize, False)
    textFont(font)
    fill(255, 0, 0)

    # 時計の表示位置
    posTimer.x = 66
    posTimer.y = 190

    # カウントダウン値(ミリ秒)を求める
    timeNow = timeStart

def draw():
    global textTimer, timeNow, textM, textS, textMS, isCameraActive

    # マウスで動くカメラ
    if isCameraActive:
        camera(mouseX, height/2, (height/2) / tan(PI/6), width/2, height/2, 0, 0, 1, 0);

    # 背景
    background(0)
    translate(0, 0, -1);
    image(bg, 0, 0)
    translate(0, 0, 1);

    # カウントダウン値(ミリ秒)を求める
    if isCameraActive:
        timeNow = timeStart - millis()

    # 分、秒、ミリ秒に分解&文字列化
    t = timeNow
    textM = "{}".format(t / (1000 * 60))
    t = t % (1000 * 60)
    textS = "{:02}".format(t / 1000) # 00ゼロ埋め
    textMS = "{:03}".format(t % 1000)[:2] # 000ゼロ埋め&左から2桁を切り出し

    # コロン(:)を結合
    text1 = textM + ":" + textS
    text2 = ":" + textMS

    # 分秒の描画(大きい部分)
    textSize(fontSize)
    text(text1, posTimer.x, posTimer.y)

    # ミリ秒の描画(小さい部分)
    marginX = textWidth(text1)
    textSize(fontSize/4*3)
    text(text2, posTimer.x + marginX, posTimer.y)

def mousePressed():
    global isCameraActive, timeStart
    isCameraActive = True
    timeStart += millis()
素材
MacのPixelmatorで作成
